05 Feb Optimize Images for Better Search Results
If you run an online store, image optimization is an art that you want to master. From attracting shoppers perusing Google images to reducing site load time – image optimization can be an important part of building a successful ecommerce business.
Have you ever stayed up at night wondering:
- Why is it that when I do a Google image search, my product photos never show up?
- Do I need to add “Alt Tags” to my images?
- What’s the difference between a JPEG, GIF and PNG – should I use one over another?
In this post I’m going to answer those questions and more. Prepare yourself for a deep dive into 10 “must-know” image optimization tips:
File Name – Name Your Images Descriptively and in Plain English
It’s really easy to blast through hundreds of product shots and keep the default file name your camera gives them. But before you keep that habit, let’s discuss why that’s not a good idea.
When it comes to SEO, it’s important to use acceptable keywords to help your webpage rank on search engines. Creating descriptive, keyword-rich file names is absolutely crucial for image optimization. Search engines not only crawl the text on your webpage, but they also search for keywords within your image file names.
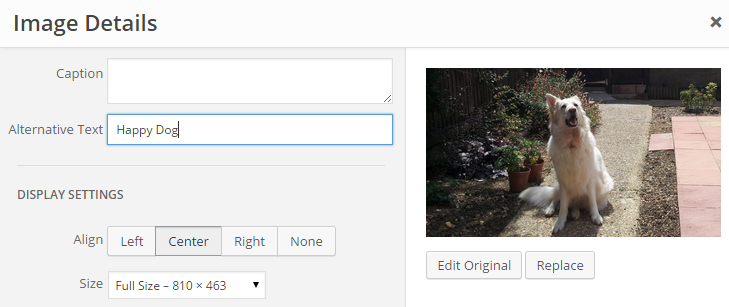
Most content management systems, such as WordPress, allow you to add alt text without having to get into any code. As demonstrated with the above image.
 Editing an image alt tag in WordPress
Every image on your website should make use of the alt attribute, and you should treat it like any other important text elements like title tags, permalinks and anchor text.
Keep the text down to a short sentence where possible, and make sure that it accurately describes the image in such a manner that it is actually useful to your human visitors.
At the same time, use your target keywords in the text wherever appropriate: It must be relevant, and as is the case with any form of keyword optimisation, you must avoid keyword stuffing.
Image Title Tag
As well as adding an alt tag, it’s also good practice to include a title for your image too, although it’s not quite as strong a ranking factor as the alt tag.
Once again, it’s very straightforward. The title code just tags onto the image…
Optimize Your Alt Tags Intelligently
Alt tags are a text alternative to images when a browser can’t properly render them. Even when the image is rendered, if you hover over it with your mouse pointer, you can see the alt tag text created for that image (depending on your browser settings).
The alt attribute also adds SEO value to your website. Adding appropriate alt tags to the images on your website can help your website achieve better rankings in the search engines by associating keywords with images. As a matter of fact, using alt tags is probably the best way for your ecommerce products to show up in Google image and web search.
Let’s take a look at the source code of an alt tag:

The #1 priority when it comes to image optimization is to fill out each alt tag for every product image on your site.
Here are some simple rules when it comes to alt tags:
- Describe your images in plain English, just like you do for image file names.
- If you sell products that have model number or serial numbers, use them in your alt tag.
- Do not keyword stuff your alt tags (for example: alt=”ford mustang muscle car buy now cheap best price on sale”).
- Don’t use alt tags for decorative images. Search engines may penalize you for over-optimization.
Finally, always do a sanity check of your website from time to time. View the source of your webpages and check to see if your alt tags are filled out.
Strategize Your Image Dimensions and Product Angles
One common trend these days is to show multiple angles of your product. Going back to the Ford Mustang example, you wouldn’t want to show just one shot of the car – especially if you’re trying to sell it. It would be in your best interest to show shots of:
- The interior.
- The rear, especially that air spoiler.
- Close ups of the wheel rims.
- Underneath the hood… it is a Mustang after all.
And the best way to capitalize on these extra photos is to fill out your alt tags. And the way you would do that is by creating unique alt tags for each product shot:
- 2012-Ford-Mustang-LX-Red-Leather-Interior-Trim.jpg -> using the alt tag of: alt = ” 2012 Ford Mustang LX Red Leather Interior Trim “
- 2012-Ford-Mustang-LX-Red-Rear-View-Air-Spoiler.jpg -> using the alt tag of: alt = ” 2012 Ford Mustang LX Red Rear View Air Spoiler “
The key here is to add descriptions to your base alt tag so that potential searchers land on your website. If you do the extra work, Google will reward you with hungry searchers.
Reduce the File Sizes of Your Images
There are numerous online tools you can use for image editing. Adobe even has an online image editing application at photoshop.com. This online tool doesn’t have all of the capabilities of the desktop version of Adobe Photoshop, but it covers all the basics of image editing and doesn’t cost an arm and a leg.
Other impressive online image editing tools are:
- PicMonkey – has been described by experts as a “staggeringly great photo editing tool”.
- Pixlr – is super user-friendly, and also comes with a 100% free app for your smartphone, so you can edit on the go.
- FotoFlexer– is another fairly advance online image editor. FotoFlexer even allows you to work with layers!
Finally, there is always GIMP. GIMP is an open-source, free image editing software application that can be run on Windows, Mac or Linux. It can do everything Photoshop can do, but tends to be a bit clunkier. But for a free image editing application – you can’t beat it.
How Large Should My Image Files Be?
A good rule of thumb for ecommerce images is to try to keep your image file size below 70kb. That can be difficult sometimes, especially for larger images, but I’ll get into that in a minute…


